
MIL
MIL-STD-461G CE101, CE102: Conducted Emissions, Audio Frequency Currents and Radio Frequency...
Standard Overview
MIL-STD-461G CE101 and MIL-STD-461G CE102 are military test standards that pertain to audio frequency currents and radiofrequency potentials for conducted emissions testing, respectively.
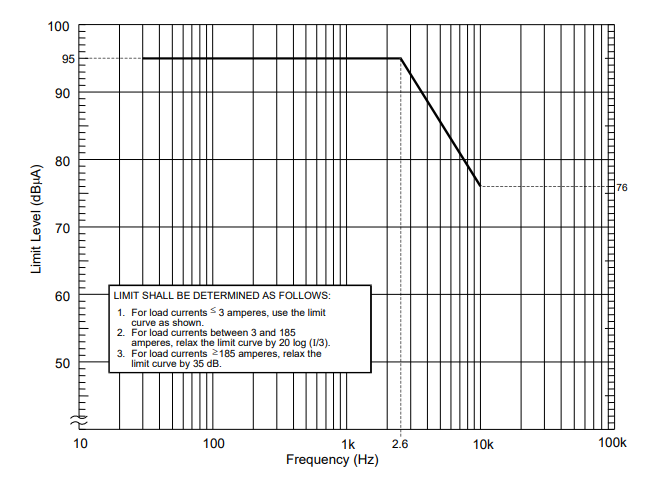
FIGURE CE101-1. CE101 limit for surface ships and submarine applications, DC.
_20.png)
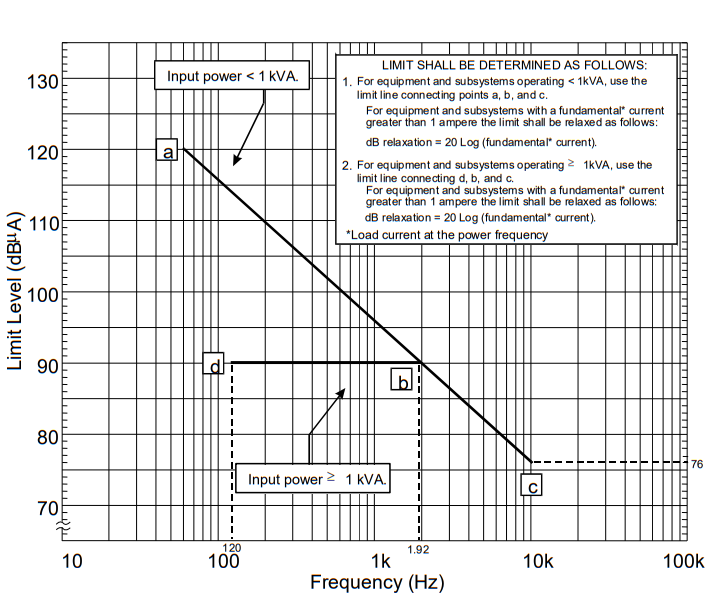
FIGURE CE101-2. CE101 limit for surface ships and submarine applications, 60 Hz.
_20.png)
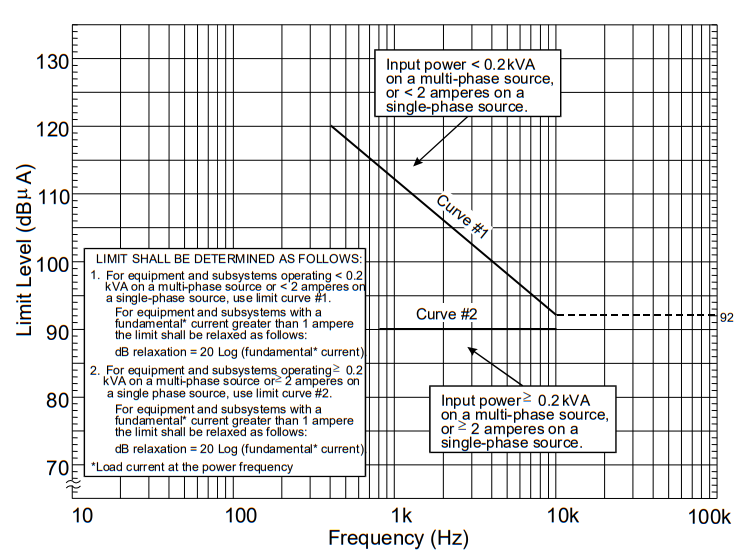
FIGURE CE101-3. CE101 limit for surface ships and submarine applications, 400 Hz.
_20.png)
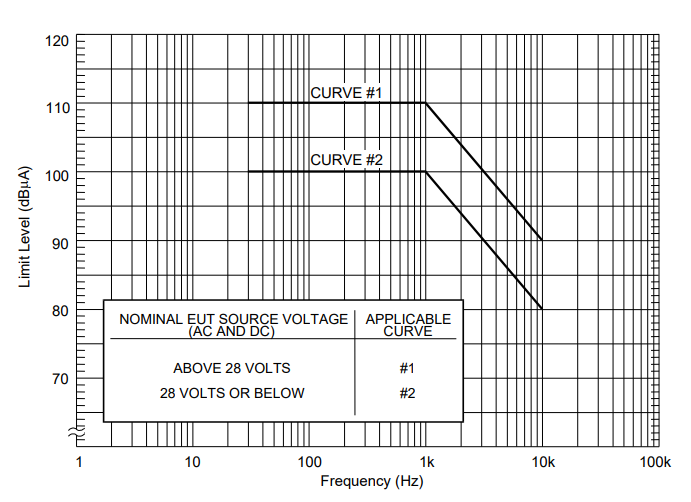
FIGURE CE101-4. CE101 limit for Navy ASW aircraft and Army aircraft (including flight line applications.
_20.png)
FIGURE CE101-5. Measurement system check.
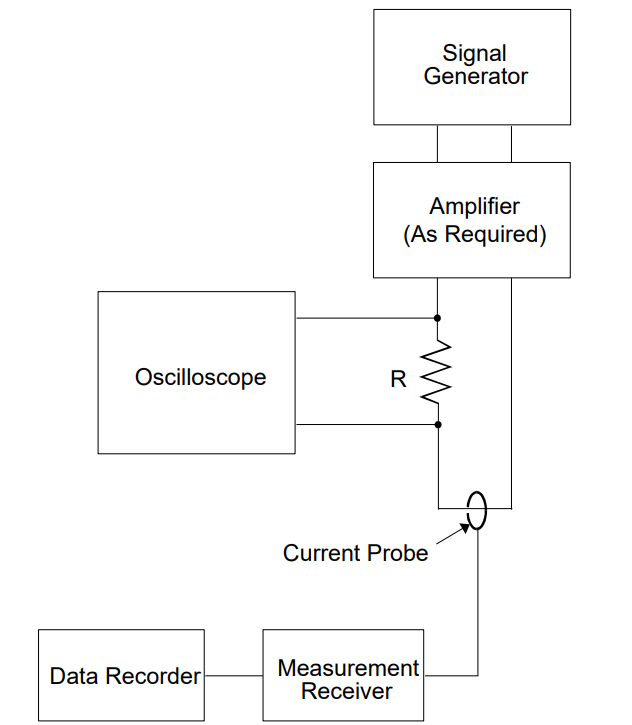_20.png)
FIGURE CE101-6. Measurement setup.
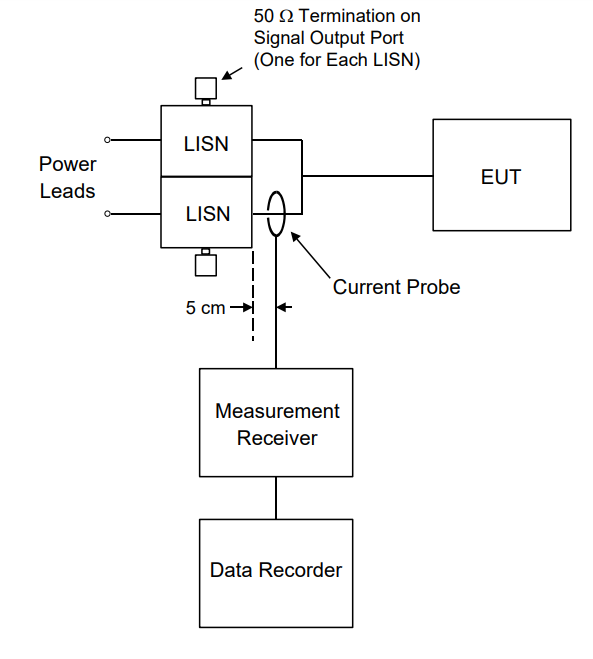_20.png)
MIL-STD-461G CE101
MIL-STD-461G CE101 applies from 30 Hz to 10 kHz for power leads, including returns, that obtain power from other sources not part of the EUT for surface ships, submarines, Army aircraft (including flight line) and Navy aircraft. For equipment intended to be installed on Navy aircraft, this requirement is applicable only if the platform contains Anti-Submarine Warfare (ASW) equipment, which operates between 30 Hz and 10 kHz, such as Acoustic (Sonobuoy) Receivers or Magnetic Anomaly Detectors (MAD). For AC applications, MIL-STD-461G CE101 is applicable starting at the second harmonic of the EUT power frequency. This test procedure is used to verify that electromagnetic emissions from the EUT do not exceed the specified requirements for power input leads including returns.Test Equipment
The test equipment shall be as follows:- Measurement receivers
- Current probes
- Signal generator
- Data recording device
- Oscilloscope
- Resistor (R)
- LISNs
Procedures
The test procedures shall be as follows:
- a. Turn on the measurement equipment and allow sufficient time for stabilization.
- b. Measurement system integrity check. Evaluate the overall measurement system from the current probe to the data output device.
- (1) Apply a calibrated signal level, which is at least 6 dB below the applicable limit at 1.1 kHz, 3 kHz, and 9.9 kHz, to the current probe.
- (2) Verify the current level, using the oscilloscope and load resistor; also, verify that the current waveform is sinusoidal.
- (3) Scan the measurement receiver for each frequency in the same manner as a normal data scan. Verify that the data recording device indicates a level within ±3 dB of the injected level.
- (4) If readings are obtained which deviate by more than ±3 dB, locate the source of the error and correct the deficiency before proceeding with the testing.
- c. EUT testing. Determine the conducted emissions from the EUT input power leads, including returns.
- (1) Turn on the EUT and allow sufficient time for stabilization.
- (2) Select an appropriate lead for testing and clamp the current probe into position.
- (3) Scan the measurement receiver over the applicable frequency range, using the bandwidths and minimum measurement times specified in Table II.
- (4) Repeat 5.4.3.4c(3) for each power lead.
Test Setup
The test setup shall be as follows:
- a. Maintain a basic test setup for the EUT as shown and described in Figures 2 through 5 and 4.3.8. The LISN may be removed or replaced with an alternative stabilization device when approved by the procuring activity.
- b. Measurement system integrity check. Configure the test setup for the measurement system check as shown in Figure CE101-5.
- c. EUT testing.
- (1) Configure the test setup for compliance testing of the EUT as shown in Figure CE101-6.
- (2) Position the current probe 5 cm from the LISN.
FIGURE CE101-1. CE101 limit for surface ships and submarine applications, DC.
_20.png)
FIGURE CE101-2. CE101 limit for surface ships and submarine applications, 60 Hz.
_20.png)
FIGURE CE101-3. CE101 limit for surface ships and submarine applications, 400 Hz.
_20.png)
FIGURE CE101-4. CE101 limit for Navy ASW aircraft and Army aircraft (including flight line applications.
_20.png)
FIGURE CE101-5. Measurement system check.
_20.png)
FIGURE CE101-6. Measurement setup.
_20.png)
MIL-STD-461G CE102
MIL-STD-461G CE102 applies from 10 kHz to 10 MHz for all power leads, including returns, which obtain power from other sources not part of the EUT. MIL-STD-461G CE102 is used to verify that electromagnetic emissions from the EUT do not exceed the specified requirements for power input leads, including returns.Test Equipment
The test equipment shall be as follows:- Measurement receiver
- Data recording device
- Signal generator
- Attenuator, 20 dB, 50 ohm
- Oscilloscope*
- LISNs
Procedures
The test procedures shall be as follows:
- a. Measurement system integrity check. Perform the measurement system check using the measurement system check setup of Figure CE102-2.
- (1) Turn on the measurement equipment and allow sufficient time for stabilization. Downloaded from www.atecorp.com MIL-STD-461G 36 CE102
- (2) Apply a signal level of 90 dBµV at 10.5 kHz and 100 kHz to the power output terminal of the LISN. At 10.5 kHz and 100 kHz, use an oscilloscope, in high impedance mode, to verify that there is a proper signal level at the LISN and verify that it is sinusoidal. After establishing the proper signal at the LISN, disconnect LISN and measure the resulting voltage using an oscilloscope with 50 ohm input impedance. The ratio of the LISN voltage to the 50 ohm voltage measurement must be within the following tolerances: at 10.5 kHz = -14 dB (+1 dB/-2 dB) and at 100 kHz = -3 dB (+1 dB/-2 dB).
- (3) Apply a signal level that is at least 6 dB below the limit at 10.5 kHz, 100 kHz, 1.95 MHz, and 9.8 MHz to the power output terminal of the LISN. At 10.5 kHz and 100 kHz, use an oscilloscope to calibrate the signal level. At 1.95 MHz and 9.8 MHz, use a calibrated output level directly from a 50 Ω signal generator.
- (4) Scan the measurement receiver for each frequency in the same manner as a normal data scan. Verify that the measurement receiver indicates a level within ±3 dB of the injected level. Correction factors shall be applied for the 20 dB attenuator and the voltage drop due to the LISN 0.25 μF coupling capacitor (see Figure 6).
- (5) If readings are obtained which deviate by more than ±3 dB, locate the source of the error and correct the deficiency before proceeding with the testing.
- (6) Repeat 5.5.3.4a(2) through 5.5.3.4a(5) for each LISN.
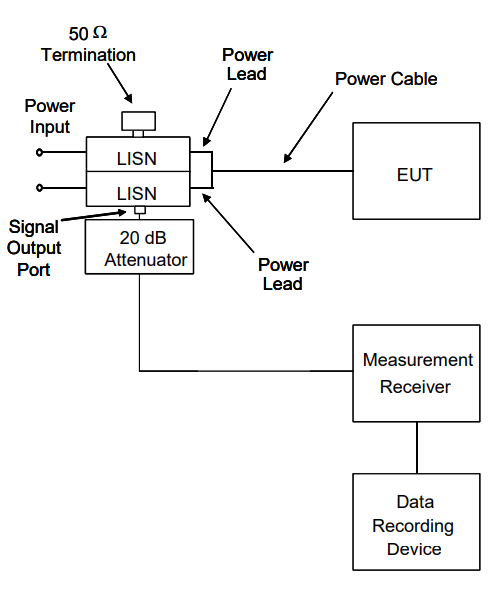
- b. EUT testing. Perform emission data scans using the measurement setup of Figure CE102-3.
- (1) Turn on the EUT and allow sufficient time for stabilization.
- (2) Select an appropriate lead for testing.
- (3) Scan the measurement receiver over the applicable frequency range, using the bandwidths and minimum measurement times in Table II.
- (4) Repeat 5.5.3.4b(2) and 5.5.3.4b(3) for each power lead.
Test Setup
The test setup shall be as follows:
- a. Maintain a basic test setup for the EUT as shown and described in Figures 2 through 5 and 4.3.8.
- b. Measurement system integrity check.
- (1) Configure the test setup for the measurement system check as shown in Figure CE102-2. Ensure that the LISN power source is disconnected.
- (2) Connect the measurement receiver to the 20 dB attenuator on the signal output port of the LISN.
- c. EUT testing.
- (1) Configure the test setup for compliance testing of the EUT as shown in Figure CE102-3.
- (2) Connect the measurement receiver to the 20 dB attenuator on the signal output port of the LISN.
FIGURE CE102-1. CE102 limit (EUT power leads, AC and DC) for all applications.
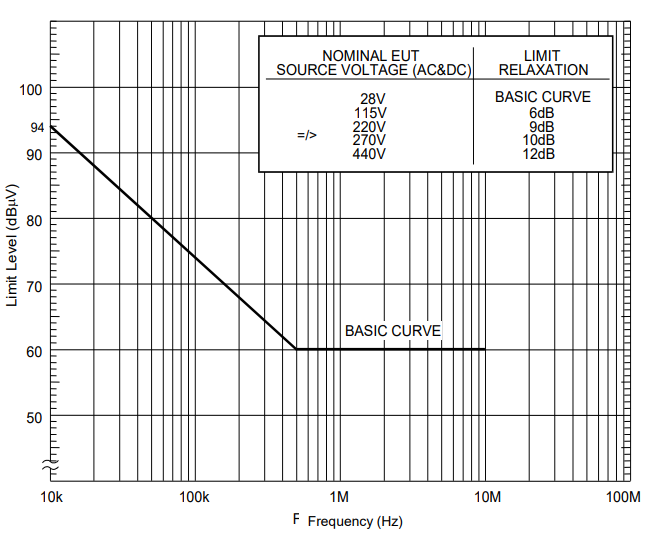
FIGURE CE102-3. Measurement setup.
Download Standard
Products Used in Testing

Keysight 11947A Transient Limiter | 9 kHz – 200 MHz
- Impedance 50Ω
- Frequency range of 9 kHz - 200 MHz
- Insertion loss of 10 dB

Rohde & Schwarz ESRP3 EMI Test Receiver, 10 Hz - 3.6 GHz
- EMI test receiver and signal/spectrum analyzer combined in one box
- Optional preselection and preamplifier (R&S ESRP-B2)
- Resolution bandwidths in line with CISPR, optionally in decade steps from 10 Hz to 1 MHz (R&S ESRP-B29)


PMM L3-100
- Current: 100A; Lines: 4, 3-phase
- Frequency: 9kHz – 30MHz
- Max. Voltage (L/N): 565 VDC


Com-Power LI-325
- Current: 25A; Lines: 2
- Frequency: 0.15 - 400MHz
- Inductance: 5μH
